| uploading_and_sharing_images_in_google_drive.pdf |
| photoshop_tools.pdf |
BASIC PHOTOSHOP EDITS TO IMPROVE YOUR IMAGES!
Before you turn in any image- whether it be a single image, or a contact sheet of 20 images, you should always edit EACH photo to make it look its best. You should never turn in a photo that is blurry, too dark, too light, dull, or poorly composed. Most of these problems can be fixed or improved using simple steps in Photoshop. Follow the steps below to make sure that each image you turn in is the best it can be.
FOLLOW THESE STEPS TO IMPROVE YOUR IMAGE:
- Improve your composition by CROPPING, RESIZING and STRAIGHTENING your image.
- Add a SHARPEN FILTER to make sure your image is sharp and focused, not blurry looking.
- Lighten photos that are underexposed or too dark OR darken photos that are overexposed or too light.
- Adjust color balance if you have a color cast on your image (i.e.: too yellow looking)
- Add vividness to your image to make colors pop.
- Apply other optional effects, filters and adjustments to make your photo your own.
FIRST A QUICK REVIEW...
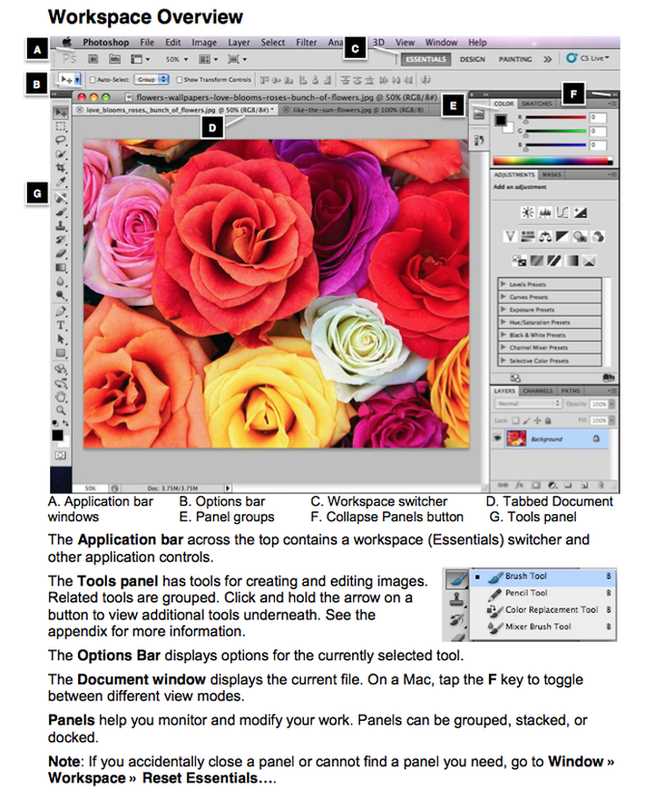
A QUICK REVIEW ON YOUR PHOTOSHOP WORKSPACE...
A QUICK REVIEW ON LAYERS...
- When you open up an image in Photoshop, it exists on a layer named Background that you can see on the layers panel. Images, text, shapes, and special effects can exist on separate layers, allowing you to make changes to one without affecting the others.
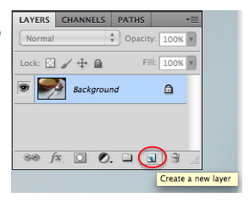
1. Always create a copy of the image layer (background layer) before you begin to edit it, in case you make a mistake or want to start over. To do this, select the layer you want to copy by clicking on it, then press Command and J on your keyboard.
To create a new blank layer, with nothing in it, click LAYER > NEW > LAYER.
- When you open up an image in Photoshop, it exists on a layer named Background that you can see on the layers panel. Images, text, shapes, and special effects can exist on separate layers, allowing you to make changes to one without affecting the others.
1. Always create a copy of the image layer (background layer) before you begin to edit it, in case you make a mistake or want to start over. To do this, select the layer you want to copy by clicking on it, then press Command and J on your keyboard.
To create a new blank layer, with nothing in it, click LAYER > NEW > LAYER.
2. CROPPING & RESIZING
TO CROP & RESIZE:
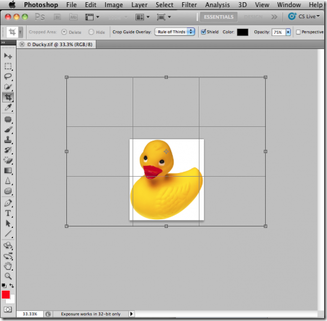
You should always resize your image to the dimensions you need. It is also a good idea to crop your image to improve your composition. To improve your image, crop out any unnecessary distractions in the background so the focus is just on your subject. We can easily resize and crop at the same time. Here's how:
1. Select the crop tool in the toolbox.
2. Choose the new size of your image. For our purposes, 8 x 10" or 10 x 8" works best. Type these values in next to "Width" and "Height" in the Options Bar. Where it says "Resolution" type in 300.
2. Drag out a box to select an area of the image to keep. When you release the mouse button, the area to be retained is highlighted. This is what the new image will look like.
3. You can move or transform the crop area by dragging the selection or the selection handles.
4. Hit the ENTER key or click the CONFIRM BUTTON (check mark in the Options Bar) to perform the crop.
TO CROP & RESIZE:
You should always resize your image to the dimensions you need. It is also a good idea to crop your image to improve your composition. To improve your image, crop out any unnecessary distractions in the background so the focus is just on your subject. We can easily resize and crop at the same time. Here's how:
1. Select the crop tool in the toolbox.
2. Choose the new size of your image. For our purposes, 8 x 10" or 10 x 8" works best. Type these values in next to "Width" and "Height" in the Options Bar. Where it says "Resolution" type in 300.
2. Drag out a box to select an area of the image to keep. When you release the mouse button, the area to be retained is highlighted. This is what the new image will look like.
3. You can move or transform the crop area by dragging the selection or the selection handles.
4. Hit the ENTER key or click the CONFIRM BUTTON (check mark in the Options Bar) to perform the crop.
3. FIXING BLURRY IMAGES
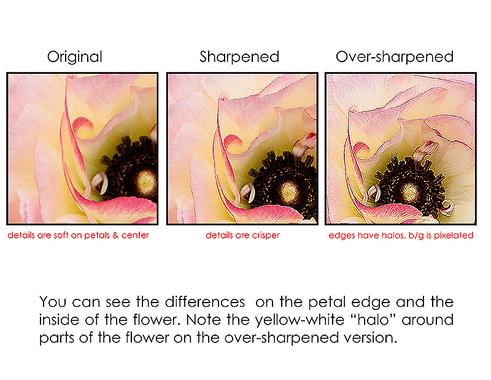
UNSHARP MASK FILTER
1. Create a copy of your layer, name it "Unsharp Mask." Make sure this layer is selected, then go to Filter > Sharpen > Unsharp Mask
3. When you get the effect you want, click OK.
UNSHARP MASK FILTER
1. Create a copy of your layer, name it "Unsharp Mask." Make sure this layer is selected, then go to Filter > Sharpen > Unsharp Mask
- Drag the Amount slider to set the amount of contrast between pixels
- Drag the Radius slider to set the number of pixels that affect the sharpening. The greater the value, the stronger the sharpen effect.
- Drag the Threshold slider to set the limit on which pixels get counted as "edges" that will be sharpened. The higher the threshold, the less widespread the sharpen effect. The default threshold value (0) sharpens all pixels in the image.
3. When you get the effect you want, click OK.
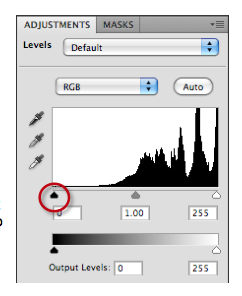
4. FIXING UNDEREXPOSED IMAGES (IMAGES THAT ARE TOO DARK!)
LEVELS ADJUSTMENT LAYER
Create a new layer by doing COMMAND + J. In addition to the auto levels option, you can manual adjust the brightness levels in an image by using a Levels Adjustment Layer. Adjustment layers don't directly change the original image, they filter the way the image appears- so you don't need to make a copy before applying one.
GO TO IMAGE > ADJUSTMENTS > LEVELS
1. Use the eyeball button on the layers panel to hide all layers except the background. Select the background layer.
2. Click on the Add Adjustment Layer button at the bottom of your layers panel. It looks like a circle that is half black and half white (like a black and white cookie!). Choose Levels. A new layer should come up called "Levels 1"
3. A spectrum of the light and dark parts of the image is shown in the Adjustments panel. Because the image is underexposed, the spectrum is probably shifted to the left. To brighten the image, move the white arrow to the left, towards the base of the spectrum.
4. Notice the new layer (Levels 1) in the Layers panel that affects the layer directly under it, much like using the blending mode.
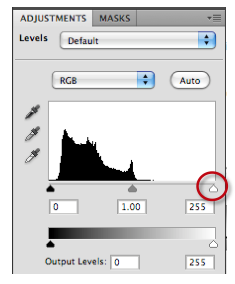
5. FIXING OVEREXPOSED IMAGE (IMAGES THAT ARE TOO LIGHT!)
LEVELS ADJUSTMENT LAYER
Create a new layer by using COMMAND + J.
GO TO IMAGE > ADJUSTMENTS > LEVELS
1. Use the eyeball button on the layers panel to hide all layers except the background. Select the background layer.
2. Click on the Add Adjustment Layer button on the bottom of the layer panel- it looks like a circle that is half black and half white (like a black and white cookie!). Select levels from the menu. A new layer named levels 1 should appear.
3. A spectrum of the light and dark parts of the image is shown in the Adjustments panel. Because the image is overexposed, the spectrum is probably shifted to the right and the light side of the spectrum gets cut off. To darken your image, move the black arrow to the right, towards the base of the spectrum.
6. IMPROVING COLOR
Sometimes, when we take pictures in less than optimal lighting our colors can turn out funny. For example, when shooting indoors with regular incandescent light bulbs, everything in our photo can appear very yellow looking. This is called a color cast. This is what to do to fix it and get those colors looking normal again!
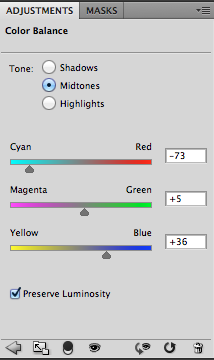
COLOR BALANCE ADJUSTMENT LAYER
1. Make sure you have your image layer selected. GO TO IMAGE > ADJUSTMENTS > COLOR BALANCE OR HUE/SATURATION.
2. Slide the arrow on the three sliders towards the color that you would like more of. For example, If you photograph is very yellow looking, slide the bottom slider away from yellow and towards the blue side. You may also want to slide it away from red towards cyan. This will adjust your colors in the mid tone regions of your photograph.
3. Then look towards the top of the adjustment panel to where it says "tone" Select "Shadows." Repeat step 2 to adjust the colors in your shadow areas.
4. Now select "Highlights." Adjust the sliders to adjust color in your highlight areas.
Continue until you are happy with the result.
Sometimes, when we take pictures in less than optimal lighting our colors can turn out funny. For example, when shooting indoors with regular incandescent light bulbs, everything in our photo can appear very yellow looking. This is called a color cast. This is what to do to fix it and get those colors looking normal again!
COLOR BALANCE ADJUSTMENT LAYER
1. Make sure you have your image layer selected. GO TO IMAGE > ADJUSTMENTS > COLOR BALANCE OR HUE/SATURATION.
2. Slide the arrow on the three sliders towards the color that you would like more of. For example, If you photograph is very yellow looking, slide the bottom slider away from yellow and towards the blue side. You may also want to slide it away from red towards cyan. This will adjust your colors in the mid tone regions of your photograph.
3. Then look towards the top of the adjustment panel to where it says "tone" Select "Shadows." Repeat step 2 to adjust the colors in your shadow areas.
4. Now select "Highlights." Adjust the sliders to adjust color in your highlight areas.
Continue until you are happy with the result.
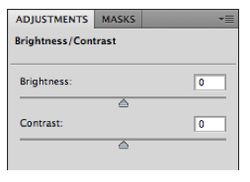
7. ADDING VIVIDNESS TO IMAGES
GO TO IMAGE > ADJUSTMENTS > BRIGHTNESS/CONTRAST or VIBRANCE
1. Click on the Add Adjustment Button at the bottom of your layers panel (looks like a black and white cookie), choose "Brightness/Contrast"
2. Increase the brightness and contrast using the sliders on the Adjustments panel until you get your desired effect.
8. GO to filter > filter gallery
Play with the different filters that you can use to overlay onto your image.
if your image is too zoomed in, go to the bottom lefthand corner and click the minus to zoom out.
remember to play with the gliders in photoshop so you can adjust the amount of filtering on the photo.
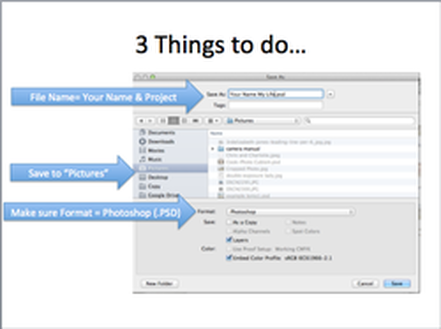
SAVING YOUR WORK...IMPORTANT!! EVERY SINGLE TIME YOU WORK IN PHOTOSHOP, YOU WILL HAVE TO SAVE YOUR IMAGE TWICE FOLLOWING THE INSTRUCTIONS BELOW!
Photoshop's "native file format" is called a "Photoshop Document" or .PSD. You should always save your work as a .PSD because it will better allow you to go back and make changes to your image later, if you need to continue editing it another day. These are the files you will open in Photoshop to continue editing your work.
However, Photoshop Documents are extremely large files, and not suitable for uploading to the internet. So you will also have to save a .JPEG version of your projects as well. .JPEGs are compressed (smaller) files that are better suited for uploading to the internet. These are the files you will TURN-IN to Schoology- NOT .PSDs.
When saving your work, you should always change the file name to be " 'Your Name' 'Project Name' " . For example: JohnSmith MylifeMyArt.jpg
You should also always save your work to your PICTURES FOLDER. So that all of your final images and projects are stored in one place.
#1: SAVE AS A PHOTOSHOP DOCUMENT (.PSD)
#2: SAVE AS A JPEG (.JPG)
- Now go back to file, and select "Save As..."
1.) Change file name to "YOUR NAME_EDITS". JPG
2.) Towards the bottom, where it says "Format" make sure the format is set to ".JPEG"
Click Save! (a pop up box will come up, just click OK)
