Leather working
objective: students will manipulate leather using advanced tools and techniques.
history:
Leather, one of mankind's oldest natural resources, is a foremost gift to man from Mother Nature. Without it man might not have survived.
The history of leather is closely merged with the progress of mankind. Long before man devised a written alphabet, he communicated through simple drawings or sign language. Many of these "messages" were done on skins of animals which he killed for food. With the skins of animals he was able to clothe and shelter himself. Modern archaeology has uncovered leather articles and artifacts from cultures dating back over 33 centuries and found them to be in an excellent state of preservation.
The ancient Romans used leather as currency, and the style and quality of a Romans sandals conveyed his status in society.
When man realized the importance of recording his thoughts and knowledge in books which he could carry and store more conveniently than stone tablets, he began to express himself on parchment leather pages.
prezi.com/0fd9usey2zrk/?utm_campaign=share&utm_medium=copy&rc=ex0share
|

|
|
important:
How to Moisten the Leather
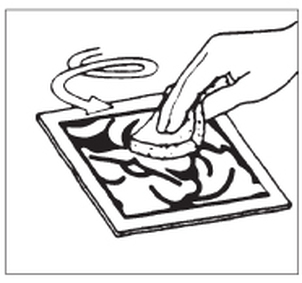
Vegetable tanned tooling leather must be moistened with water before you can work with it. This procedure is called casing. As you wet the leather, the fibers swell and soften, thus enabling you to stamp and shape it. Leather is moistened by rubbing a damp sponge on it. Be sure your hands are clean. Rub the damp sponge on the flesh side and then on the grain side. Apply the water as evenly as possible. When the leather begins to return to its natural color, begin stamping. If your leather dries before you complete the tooling design, it will be necessary to remoisten. Be sure you case the entire piece to avoid water spots.
Vegetable tanned tooling leather must be moistened with water before you can work with it. This procedure is called casing. As you wet the leather, the fibers swell and soften, thus enabling you to stamp and shape it. Leather is moistened by rubbing a damp sponge on it. Be sure your hands are clean. Rub the damp sponge on the flesh side and then on the grain side. Apply the water as evenly as possible. When the leather begins to return to its natural color, begin stamping. If your leather dries before you complete the tooling design, it will be necessary to remoisten. Be sure you case the entire piece to avoid water spots.
techniques:
|
How to Use Craftool Stamps
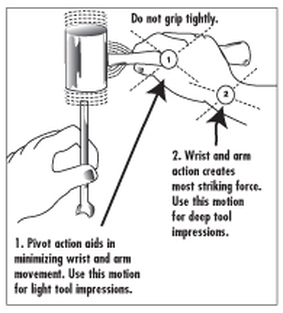
Enhance the beauty of your leather projects with Craftool stamps. These may be used to create original designs or for embellishing the beauty of your carved design. Use a wood or rawhide mallet head to strike the top of the stamp to obtain its impression in the leather. Caution: Never strike Craftool stamps with a metal faced hammer, as this will damage tools. Hold both the mallet and decorative stamping tool upright in a secure, but relaxed manner. Hold the mallet in the center of the handle with your fingers rather than the palm of your hand. |
|
|
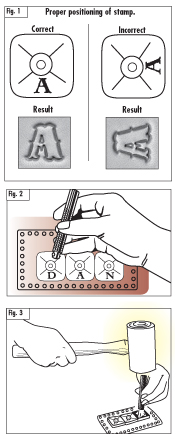
Using Craftool Alphabet and 3-D Stamps
Alphabet stamps are a quick way of personalizing your leathercraft projects. 3-D stamps come in a wide variety of designs like animals, pictorials, symbols, etc. For best results: 1. Make sure leather is moistened (see page 1). 2. Place leather on top of a firm surface like marble. This will help you create deep impressions. 3. Properly position stamp(s) on leather (Fig. 1). 4. Place handle in stamp (Fig. 2). 5. Make sure you hold the handle down firmly while striking with mallet (Fig. 3). This will prevent the stamp from bouncing. Bouncing creates undesirable multiple impressions on the leather. |
|
How to Apply Leather Finish
Leather finishes are applied to protect the leather and preserve the qualities and appearance. Before applying leather finish, there are several points which you should know: • All tooling of the design must be completed before finish is applied. • Be sure the surface area is dry and clean of any dirt, dust or other matter. • Leather finishes must be applied prior to assembly. 1. Press a sponge dampened slightly with water to the top of a bottle of leather finish and tip the bottle so a little finish flows onto the sponge. 2. Apply a light coat of finish to the carved side of the leather, moving the sponge in a circular motion over the leather. Work the finish into the cuts and impressions. 3. Let the finish dry thoroughly, then apply a second coat if you desire a shinier finish. Allow the piece to dry thoroughly. 4. If a high gloss is desired, buff the leather with a piece of sheepskin or a clean, soft, lint-free cloth. The project is now ready to be assembled, either by stitching with waxed thread or by lacing with leather or plastic lace. |
|
leather lacing tutorial
|
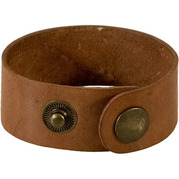
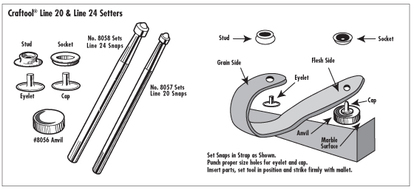
How to Set Line 20 & Line 24 Snaps Use these snaps for holsters, straps, vests, etc. where a firm fastener is required. Line 20 is for 5 to 7 oz. leather. Line 24 is for 8 to 10 oz. leather. |
