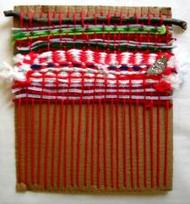
woven pouch
objectives: students will utilize traditional weaving techniques to create a weaving using personal motifs and colors.
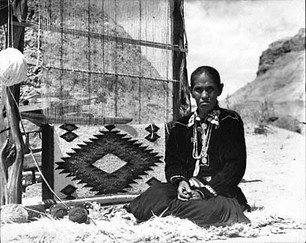
a brief history of navajo loom weaving:
|
Navajo Native Americans, now the largest tribal group in America, live in parts of Arizona, New Mexico, and Utah. Originally from the north, the Navajo were late arrivals in the Southwest. They learned sheep herding from the Spaniards and weaving from the Pueblos in the early eighteenth century. From this beginning, they became the greatest of all Native American weavers.
Early Navajo weaving was made into clothing in the form of blankets worn around the shoulders. Later, the Native Americans began to wear manufactured blankets, and weaving began to die out. However, the trading posts realized the commercial value of the fine work, and the Navajos began to weave saddle blankets and rugs to sell. |
|
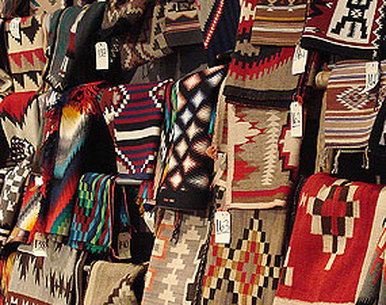
The early blankets were designed with stripes, edge to edge. The weaving made to sell became heavier so that it could be used for rugs. With this change came changes in design: new geometric shapes and borders. Over the past two hundred years, the Navajo have acquired skills through experimentation and handed them down through the generations; some designs have become very complex. There are now, in general, four categories of Navajo rugs:
|
|
|
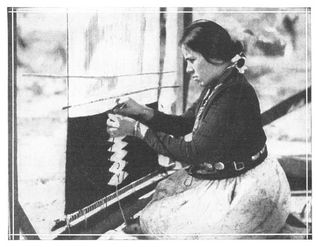
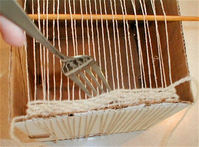
Different areas of the reservation have become famous for distinct styles and designs. But all weave basically in the ancient manner. Although some spun wool is now purchased commercially, generally sheep must be raised and the wool sheared, carded, spun, dyed, and rolled into balls. The loom is usually set up outdoors with the vertical warp strung between heavy logs suspended from trees or a wooden frame. The rug is woven by passing the weft over and under the warp threads and beating it down securely with a wooden comb. Heddles attached to every other thread open a shed to pass the weft through. A rug may take many weeks or months to weave, depending on its size. the design, no matter how intricate, is kept in the head of the weaver until it appears, wondrously, centered and perfect, row by row.
|
important terms to know:
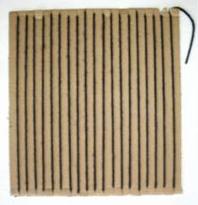
warp
|
weft |
|
- The threads stretched lengthwise on the loom.
- Attaching the warp threads to the loom is referred to "warping the loom." |
|
- The threads woven through the warps. |
shot |
hill |
|
- A woven row.
|
|
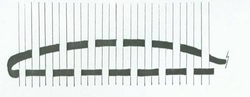
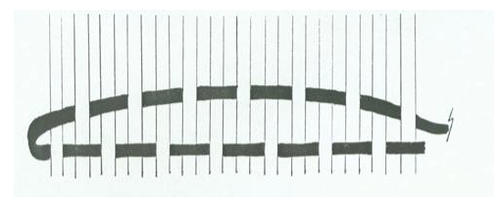
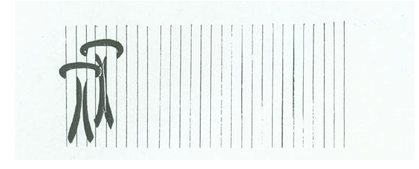
-a slight curve is added to the weft before beating it in, in order to prevent the selvage. from becoming distorted
|
beat |
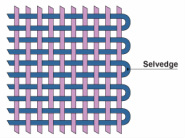
selvage
|
|
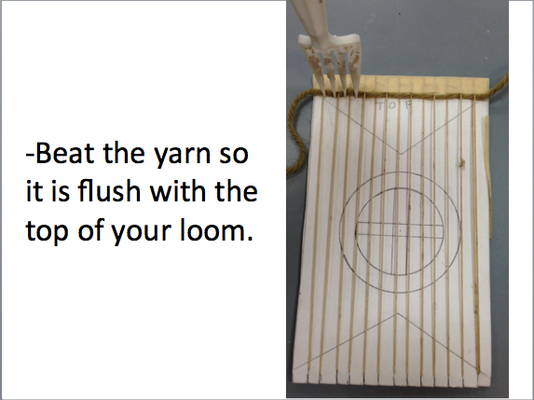
-to push the weft close to the previously woven weft
|
|
-the woven sides of the piece.
|
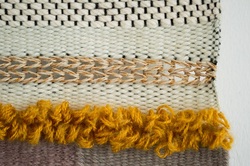
practice assignment:
create a sampler of 5 or more techniques
|
- First you will practice using several different weaving techniques and materials.- Warp a cardboard loom, using an even number of warps.
- Create a sampler demonstrating at least five of the different techniques shown below. - Use a variety of materials including: yarn, string, electrical wire, fabric scraps, grasses, twigs, dryer lint, etc. - Maintain an even selvage. -Weave to within ½-1" of the top of the loom. - Remove the sampler from the loom and finish the ends with one of the finishing techniques. |
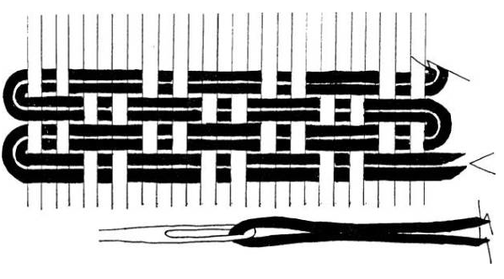
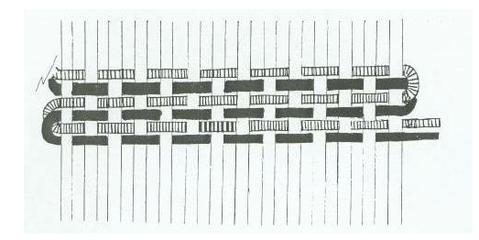
tabby weave (plain weave)
|
Tabby Weave- This is your basic weave.
Over 1, under 1. (Does not matter if you start over or under.) The bubble in this diagram demonstrates how to keep the selvages straight. |
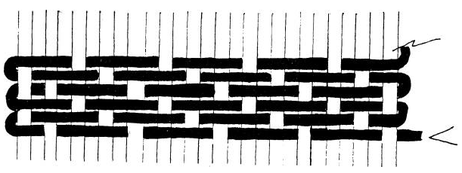
basket weave
|
Basket weave--over 2, under 2. (Does not matter if you start over or under.) Use a double strand of weft.
|
vertical bars
|
Vertical bars--tabby weave with two colors. Use two 6" needles.
|
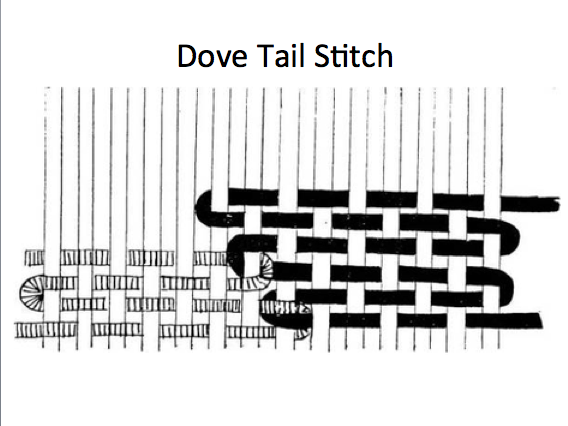
dovetail

|
Dovetail--to change color within the shot. Use two needles.
|
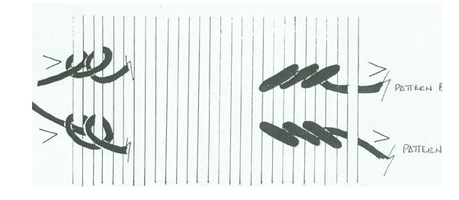
manipulated weft
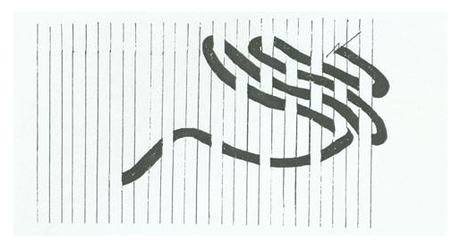
|
Manipulated weft--to create curves and organic shapes. Tabby one shot, then push into place. Add more shots to fill in.
|
twill weave
|
Twill weave--under 1, over 2. This is how jeans and khakis are woven! You'll see the diagonal rows emerge. Create a new shed for each shot from the same side you started.
|
twinning
|
Twining--creates two-color diagonal stripes or zigzags. Start with a row of tabby, then twine the second color around it, alternating the over/under. Use a 6" (15.25 cm) needle for color A, and a 3" (7.6 cm) needle for color B. Reverse the direction of the pattern by changing the direction from which you twine color B. In the diagram, the needle is shown coming from above color A. On the next shot, bring the needle up from below color A to reverse the pattern.
|
ghiordes
|
Ghiordes (YOR-deez) knot--traditional knotting technique for pile carpets. Use 4" (10 cm) strands of yarn. Add a row of tabby after every two rows of knots. Shear the pile to desired height.
|
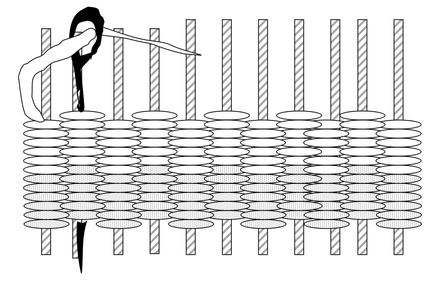
soumak
|
Soumak--another traditional carpet technique. Creates single color diagonals or zigzags. Use a 3" needle. The right side of the diagram shows which way the wefts will slant after beating in.
|
securing the beginning and end of your weft (when you are done with the weaving)

|
FINISHING YOUR TAPESTRY. Thread a tapestry needle with your weft end. Following a warp thread, take the needle and put it between your weft layers for about 2”. , then trim.
|
create a weaving with your own personal motifs and colors.

|
-You will make a woven pouch / bag. Your pouch can serve as a case for a phone/ipod/camera/sunglasses etc...
- Your weaving must incorporate a symbol/motif/design/pattern and a minimum of 3 colors. - Cut a piece of cardboard slightly larger than the size you would like your finished pouch to be. - Sketch out your design on a sheet of paper in a 3 1/2" x 6" box. - Look through the provided books and handouts of Native American symbols and designs for inspiration, or choose a symbol that is personal/significant to you. |
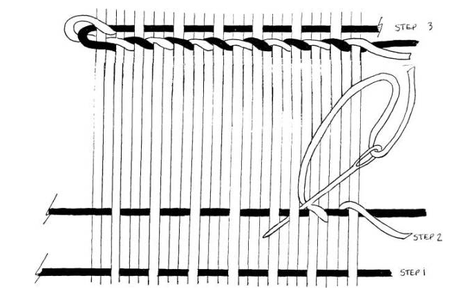
warping the loom

|
Measure and mark every 1/4 inch along the top and bottom edge of your cardboard.
Cut with scissors, about 1/4" deep. |
|
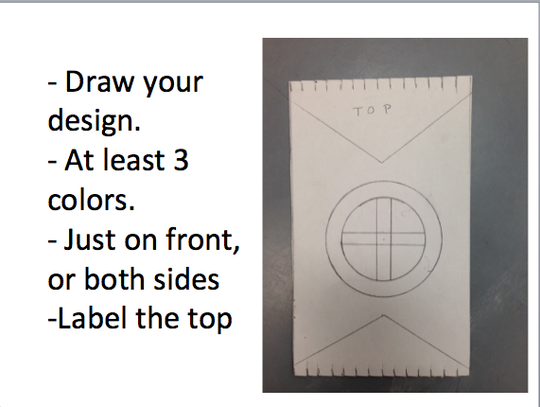
Draw your design on your loom.
Remember it should have at least 3 colors. You can choose to just have your symbol on the front, or on both sides. Write "Top" at the top of your loom. |
|
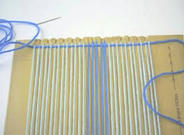
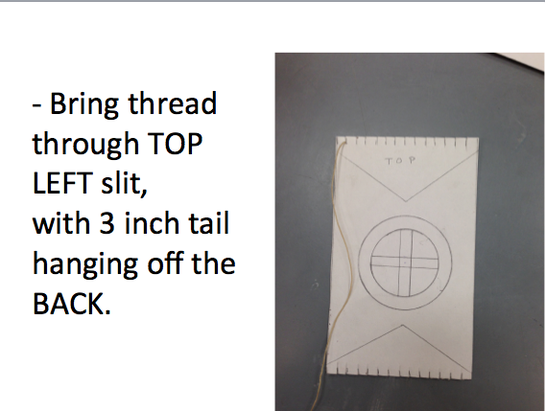
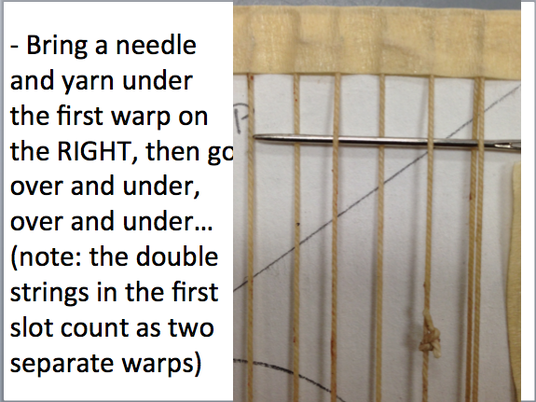
Time to string your loom!
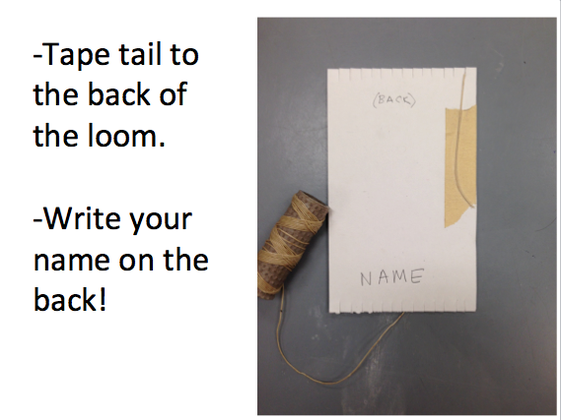
Use string or thread. Leave it attached to the skein while you're stringing, and cut it off when you're done. Begin by wedging the end of the string into the first slit in the cardboard, with a 3 inch tail hanging off the BACK. |
|
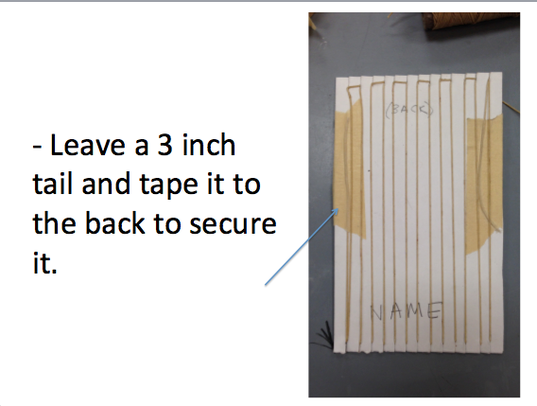
Secure the end tail of the string to the back of the loom with a piece of tape.
Write your name clearly on the back. |
|
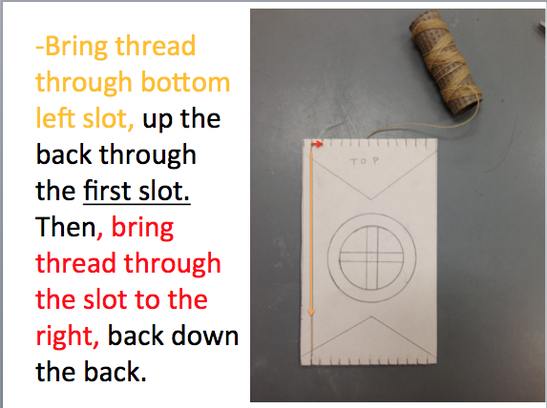
Now bring the thread down the front of the loom to the bottom, through the left-most slot.
Then, bring the thread up the back side of the loom, back through the FIRST slot. Then, bring the thread through the second slot on the top, and then back down the back of the loom. |
|
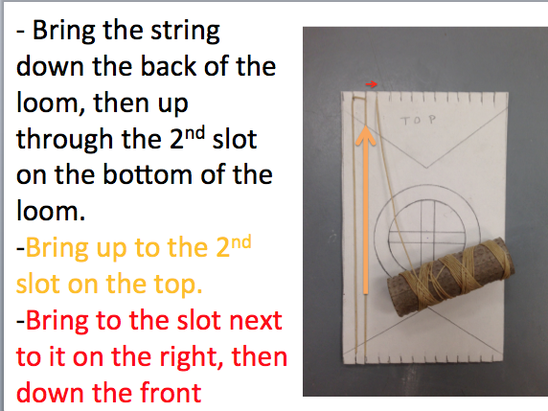
After bringing the string down the back of the loom, bring it up through the second slot on the bottom, towards the top.
Bring it through the second slot on the top. Then bring it to the next slot, the third slot on the top, wrapping it back around to the front of the loom before bringing it back down. |
|
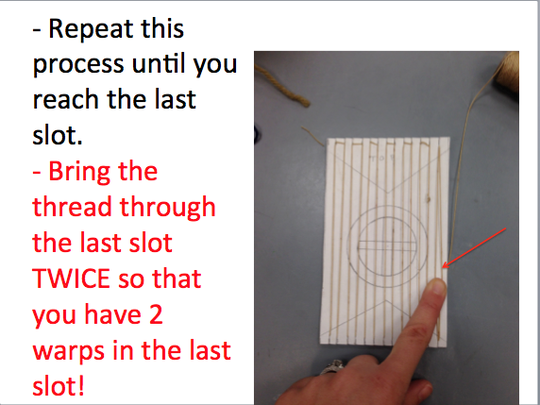
Repeat this process unit you reach the last slot.
Bring the thread through the last slot TWICE so that you have TWO warps in the last slot. |
|
Finish it with a 3 inch tail secured to the BACK of the loom with a piece of tape.
|
|
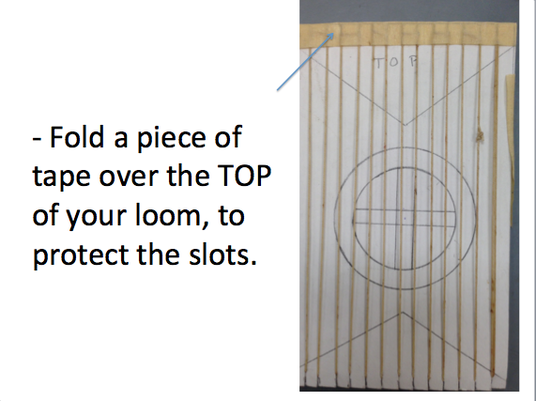
Finally fold a piece of tape over the top of the loom to protect the slots.
|
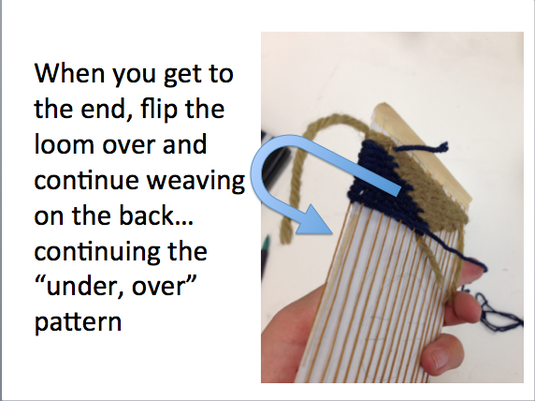
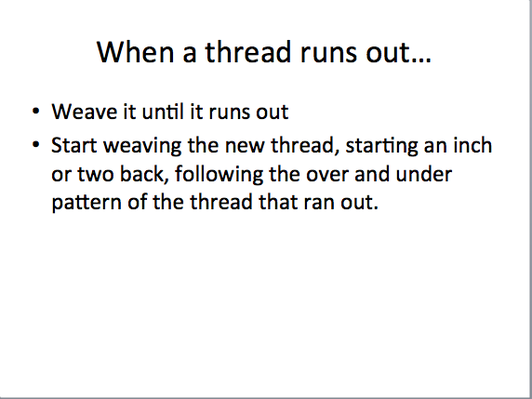
weaving...

making your pattern / design...
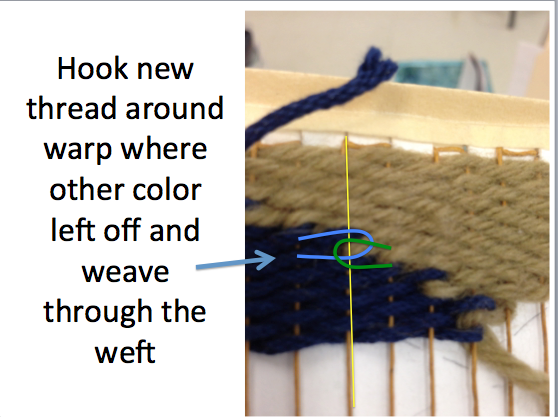
joining 2 different colored sections together...
|
|
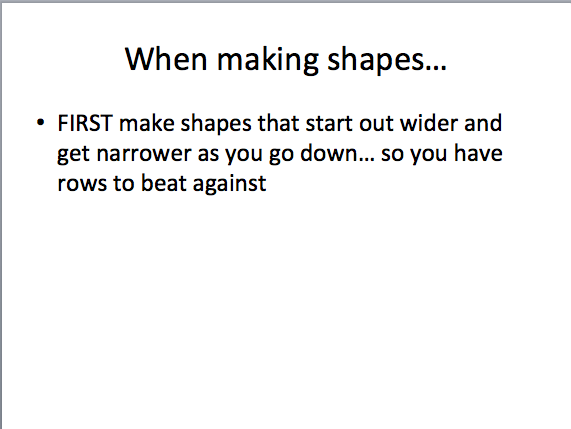
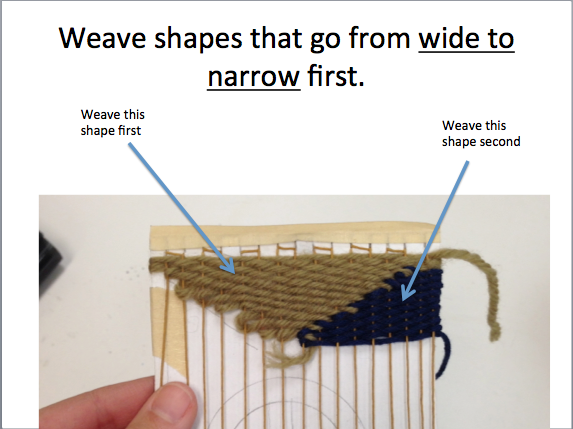
important
|
|
other tips
Try to incorporate a few different weaving techniques listed above. Also, don't be afraid to incorporate different materials into your pouch! Instead of yarn, you can try ribbon, fabric, felt, wire, beads, grass, dryer lint, anything!
finishing your pouch
|
Continue weaving until you have reached the absolute bottom of your loom.
Take your pouch off of the cardboard loom. Secure your end warp threads following the instructions below. Cut down any weft threads that are hanging out. FINISHING YOUR TAPESTRY. Thread a tapestry needle with your weft end. Following a warp thread, take the needle and put it between your weft layers for about 2”. , then trim. |
|
